Frameless Cabinet Hinges: Complete Installation Guide
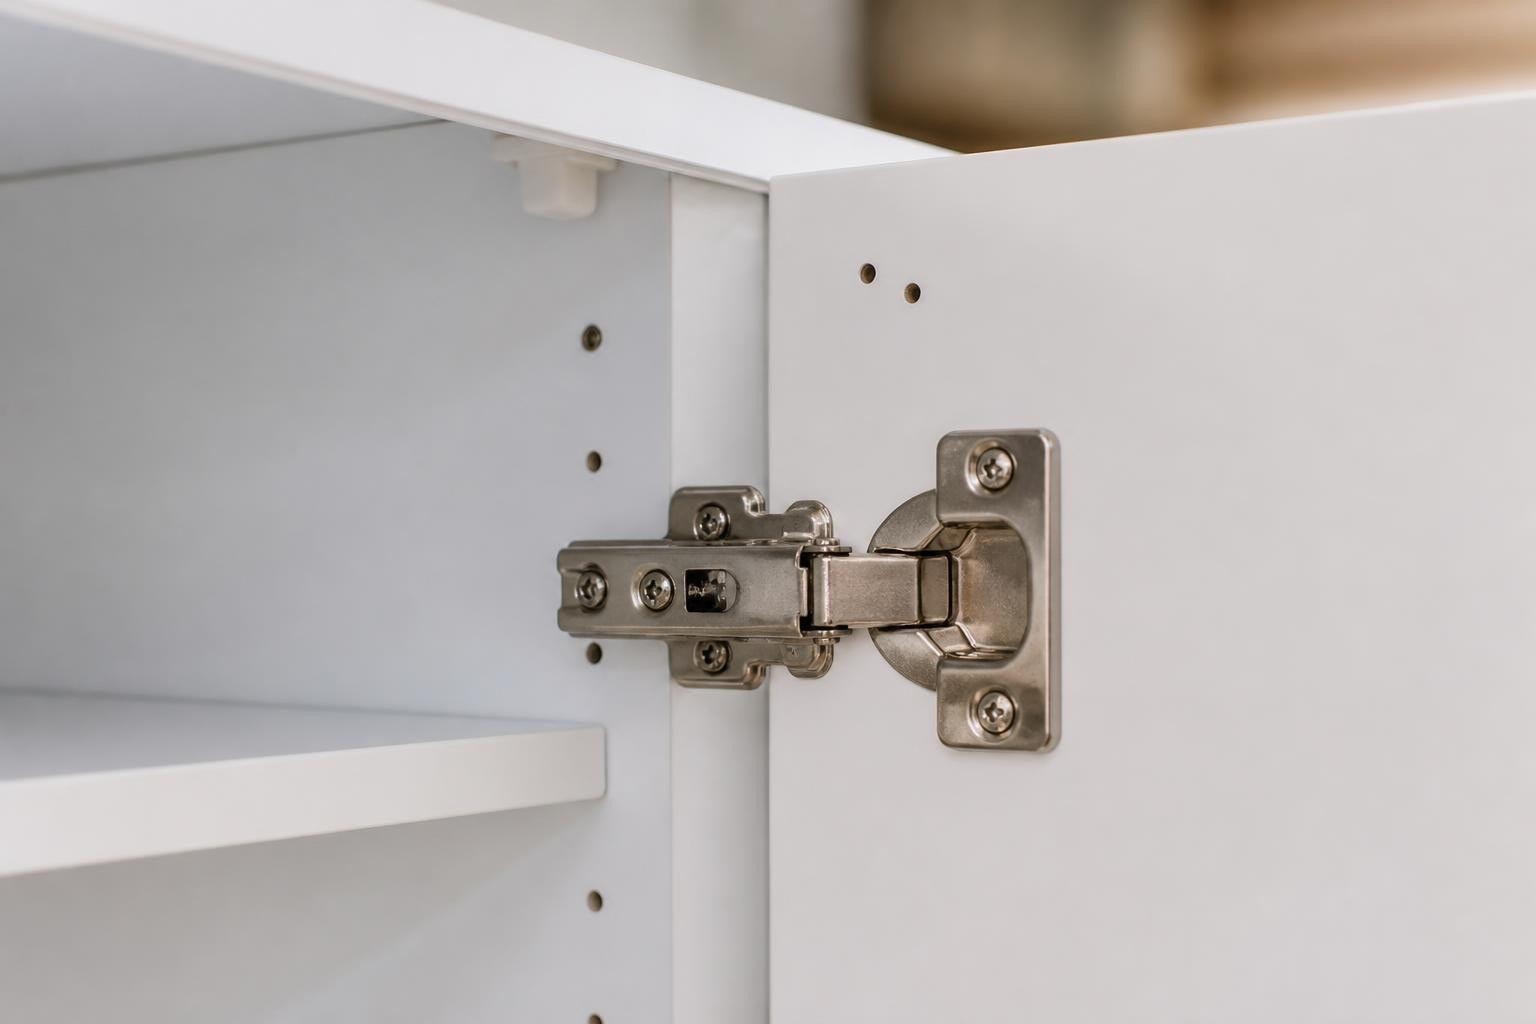
Modern kitchen and furniture design has evolved dramatically over the past few decades, with European-style cabinetry leading the charge toward cleaner lines and more efficient use of space. At the heart of this design revolution sits one critical component: frameless cabinet hinges. These specialized hardware pieces enable the full-overlay doors that define contemporary cabinetry, providing both aesthetic appeal and functional performance. Whether you're a DIY homeowner upgrading your kitchen or a professional installer working on custom projects, understanding the mechanics, types, and installation techniques for these hinges is essential for achieving professional results.
Understanding Frameless Cabinet Construction
Frameless cabinets, also known as European-style or full-access cabinets, differ fundamentally from traditional face-frame construction. Instead of doors mounting to a front frame, frameless cabinet hinges attach directly to the cabinet side panels. This design eliminates the face frame entirely, maximizing interior storage space and creating the sleek, modern aesthetic that has become increasingly popular in contemporary homes.
The absence of a face frame means the hinge must perform differently than traditional hardware. Frameless cabinet hinges use a cup-and-arm system where a circular recess (the cup) drills into the door, and the mounting plate attaches to the cabinet side. This configuration allows for exceptional adjustability in three dimensions: depth, height, and side-to-side positioning.
Key Advantages of Frameless Design
Space efficiency stands as the primary benefit of frameless construction. Without a face frame consuming interior volume, cabinets provide approximately 10-15% more usable storage space. This improvement becomes particularly valuable in smaller kitchens where every centimeter counts.
The hardware also delivers superior adjustability compared to traditional hinges. Modern frameless cabinet hinges feature tool-free adjustment screws that allow precise door alignment even years after installation. This adjustability proves invaluable when buildings settle or when homeowners need to compensate for uneven floors or walls.
Types of Frameless Cabinet Hinges
Selecting the appropriate hinge type depends on door overlay, cabinet application, and desired functionality. Understanding these categories helps ensure proper specification and installation success.
Overlay Classifications
| Overlay Type | Door Coverage | Typical Application | Gap Between Doors |
|---|---|---|---|
| Full Overlay | Covers entire cabinet side | Standard cabinets | 2-4mm |
| Half Overlay | Covers approximately half | Shared partition walls | Variable |
| Inset | Sits flush inside cabinet | Traditional/custom designs | Frame-dependent |
Full overlay hinges represent the most common choice for frameless cabinetry. These frameless cabinet hinges position doors to cover the cabinet sides completely, creating minimal visible gaps between adjacent cabinet boxes. Standard full overlay typically leaves just 2-3mm between doors, though specifications vary by manufacturer.
Half overlay configurations become necessary when two doors share a common partition wall. Each door covers approximately half of the partition thickness, allowing both to open without interference. Professional installers frequently encounter this situation in double-door base cabinets or tall pantry units.
Opening Angle Specifications
Not all applications require the same opening range. Standard frameless cabinet hinges provide 95-110 degree opening angles, suitable for most kitchen applications. However, specific situations demand specialized solutions:
- Wide-angle hinges (165-170 degrees) enable doors to fold nearly flat against adjacent cabinet sides, essential for corner applications or where full access is required
- Restricted-angle hinges (95 degrees or less) prevent doors from swinging too far, protecting adjacent walls or appliances
- Bi-fold hinges accommodate special door configurations in corner cabinets or limited-clearance situations
Installation Process and Techniques
Proper installation of frameless cabinet hinges requires precision, appropriate tools, and systematic approach. Professional results depend on accurate measurements and careful attention to drilling depth and positioning.
Essential Tools and Preparation
Before beginning installation, gather the necessary equipment:
- 35mm Forstner bit (for hinge cup holes)
- Drill with depth stop or drilling jig
- Screwdriver (Phillips or Pozidrive, depending on hinge brand)
- Measuring tape and pencil
- Cabinet installation jig (optional but highly recommended)
For those handling multiple cabinet projects, investing in a quality cabinet hardware jig dramatically improves consistency and speed while reducing measurement errors.
Step-by-Step Installation Method
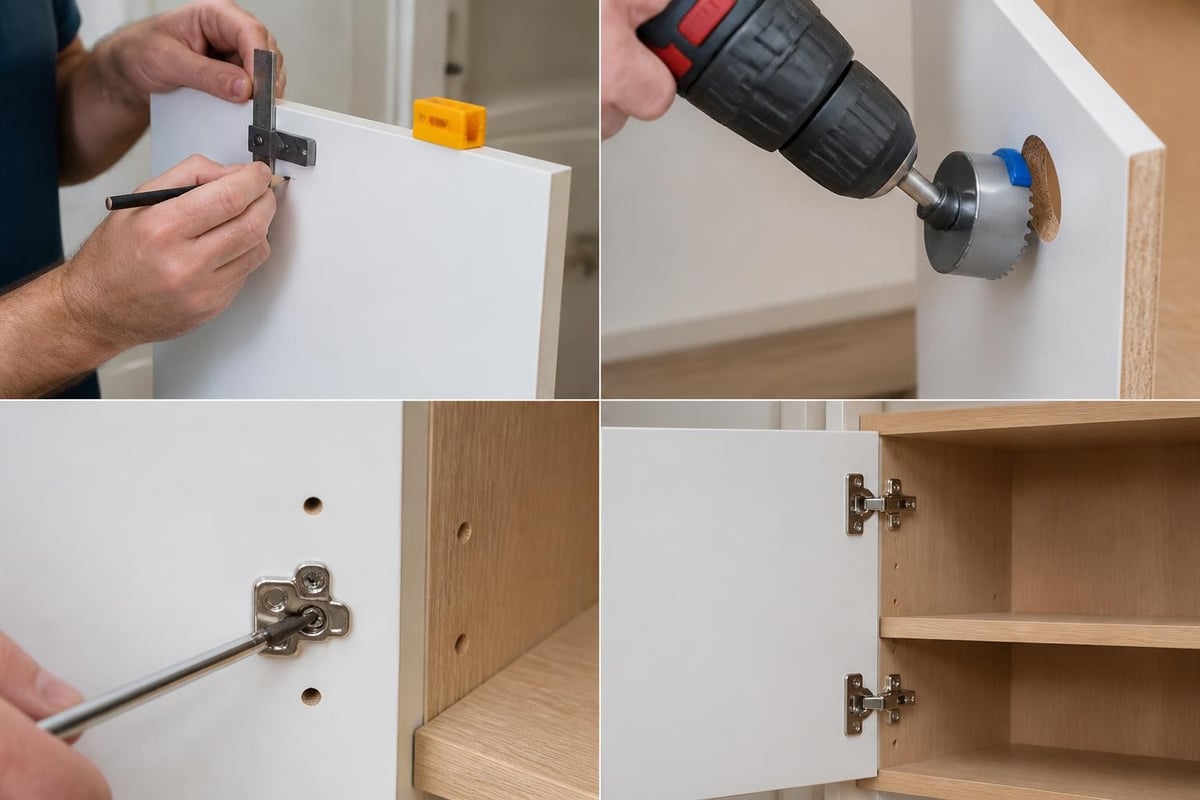
Step 1: Mark hinge cup positions on the door back. Standard placement positions the hinge cup center 22mm from the door edge and typically 90-100mm from the top and bottom edges. Adjust these measurements for larger or smaller doors to maintain proportional appearance.
Step 2: Drill hinge cups using a 35mm Forstner bit. Depth matters critically here. Most frameless cabinet hinges require 11-13mm cup depth. Set your drill's depth stop accurately, as drilling too deep weakens the door while insufficient depth prevents proper hinge seating.
Step 3: Install hinge cups by pressing them into the drilled recesses and securing with the provided screws. Ensure hinges sit flush and fully seated before tightening.
Step 4: Attach mounting plates to the cabinet sides. Position varies by overlay type, but full overlay typically places the mounting plate 37mm from the cabinet front edge. Use a straightedge or laser level to ensure mounting plates align vertically across multiple cabinets.
Step 5: Connect door to cabinet by clipping the hinge arm onto the mounting plate. Most modern frameless cabinet hinges feature clip-on mechanisms requiring no tools for this step.
Common Installation Mistakes to Avoid
Even experienced installers occasionally encounter issues. Awareness of common pitfalls prevents frustration and rework:
- Inconsistent cup depth creates doors that don't align properly. Always use depth stops or jigs to ensure uniform drilling across all doors.
- Incorrect overlay calculations result from measuring errors or using wrong hinge types. Verify overlay specifications before drilling.
- Skipped pre-drilling for mounting plate screws can split cabinet sides, especially near edges. Take the extra time to pre-drill pilot holes.
- Reversed mounting plates cause adjustment screws to face the wrong direction. Check orientation before securing plates.
Adjustment and Alignment Techniques
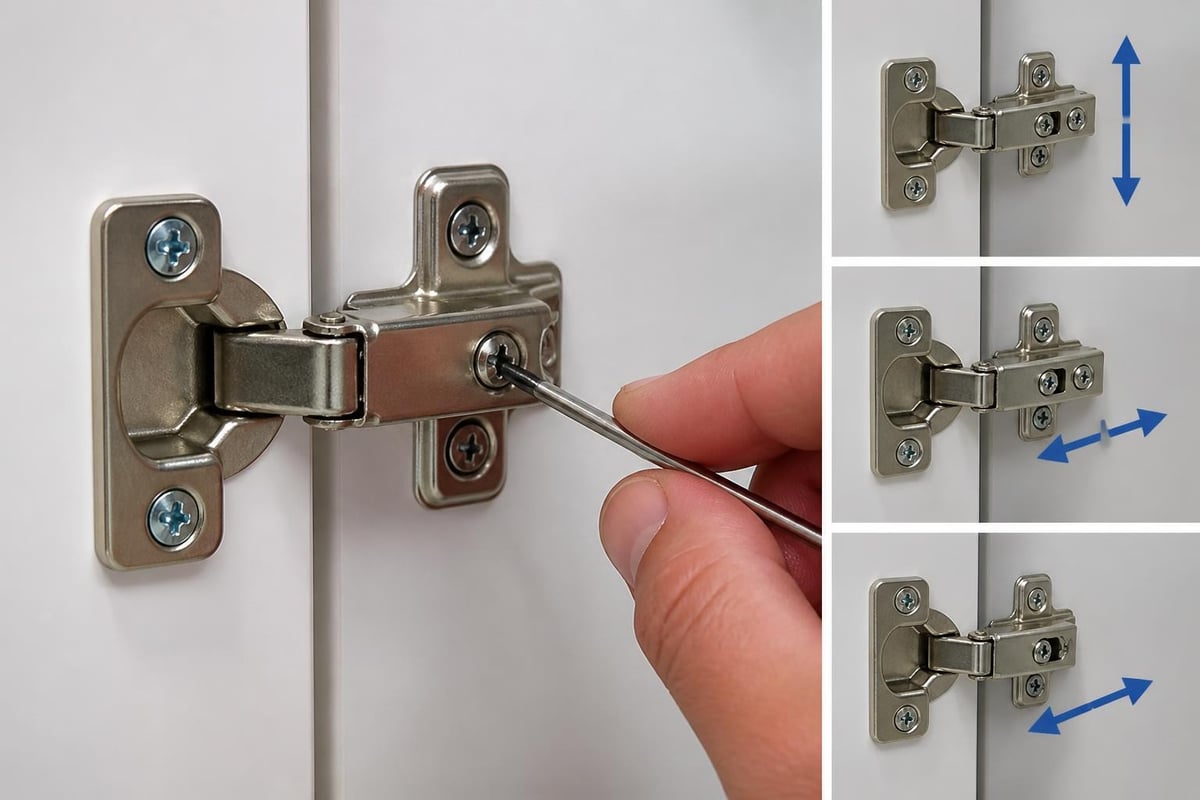
One significant advantage of frameless cabinet hinges lies in their exceptional adjustability. Understanding these adjustment mechanisms enables perfect door alignment even in challenging installations.
Three-Dimensional Adjustment System
Modern hinges provide independent control over three axes:
Depth adjustment (in-and-out movement) typically offers plus-or-minus 2-3mm of range. Turn the front adjustment screw clockwise to move the door closer to the cabinet, counterclockwise to pull it away. This adjustment corrects doors that protrude too far or sit too deep.
Height adjustment (up-and-down movement) happens at the mounting plate. Loosen the mounting plate screws slightly, shift the door vertically, then retighten. Some premium frameless cabinet hinges feature cam-adjustable mounting plates for tool-free height changes.
Side-to-side adjustment (lateral movement) uses the adjustment screw located on the hinge arm where it attaches to the mounting plate. This control fine-tunes door positioning to create uniform reveals between adjacent doors.
Systematic Alignment Approach
When aligning multiple cabinet doors, work methodically:
- Establish a reference door by perfectly aligning one door in a run of cabinets
- Match adjacent doors to the reference, creating consistent reveals
- Check diagonal measurements on tall doors to ensure they're not twisted
- Verify parallel lines by stepping back and viewing the entire cabinet run from different angles
For comprehensive guidance on achieving professional alignment, review techniques covered in detailed kitchen hardware installation resources.
Soft-Close and Premium Features
Contemporary frameless cabinet hinges increasingly incorporate advanced features that enhance user experience and extend hardware lifespan. Understanding these options helps homeowners and installers make informed specification decisions.
Integrated Soft-Close Mechanisms
Soft-close technology has transitioned from luxury feature to standard expectation in quality installations. These damping systems slow door closure during the final 10-15 degrees of travel, preventing slamming and reducing noise.
Integrated soft-close hinges build the damping mechanism directly into the hinge body. This design creates a cleaner appearance and eliminates separate damper components. However, if the soft-close mechanism fails, the entire hinge requires replacement.
Separate damper systems attach to the cabinet interior independently from the hinge. While requiring additional installation steps, these allow damper replacement without changing hinges.
Premium Construction Materials
Entry-level frameless cabinet hinges typically feature steel construction with basic plating. Professional-grade options upgrade to:
- Stainless steel components for superior corrosion resistance in humid environments
- Powder-coated finishes that resist scratching and wear better than electroplating
- Reinforced hinge arms with thicker gauge steel for heavy solid-wood doors
- Extended warranties reflecting manufacturer confidence in durability
Troubleshooting Common Issues
Even properly installed frameless cabinet hinges occasionally develop problems. Recognizing symptoms and understanding solutions keeps cabinets functioning optimally.
Door Alignment Problems
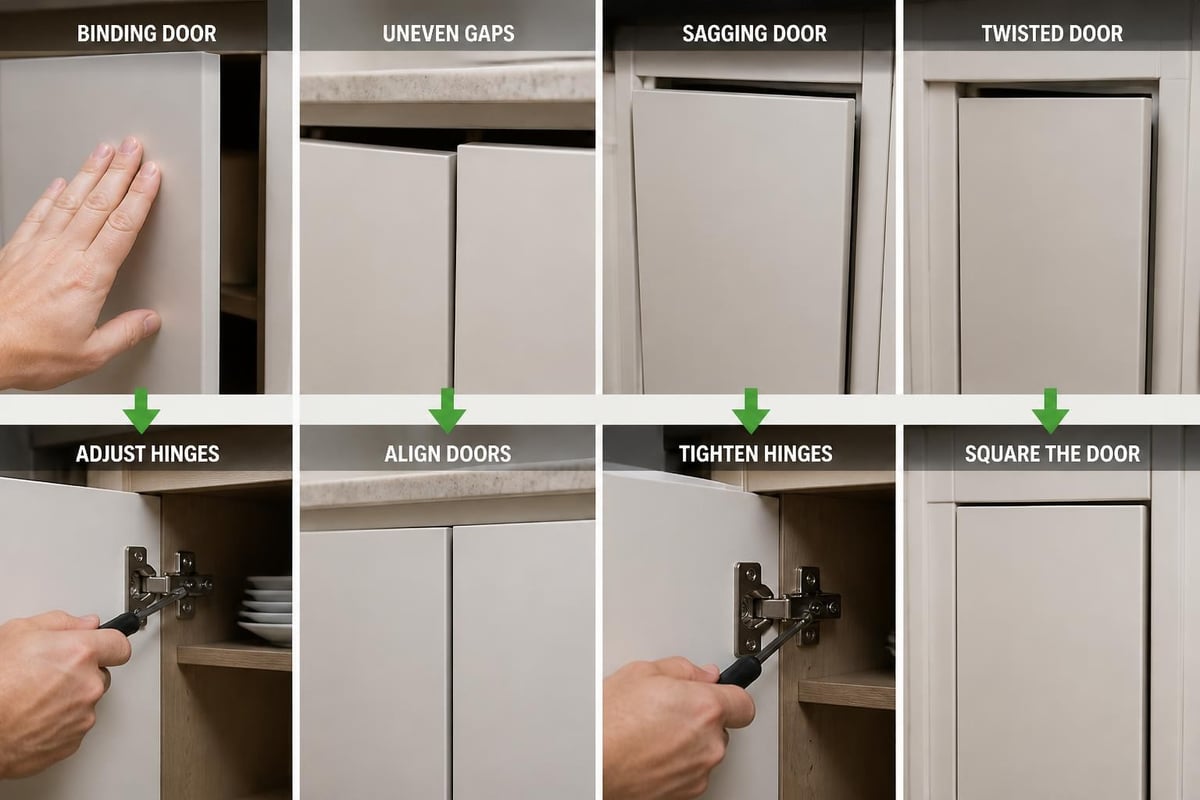
Symptom: Doors don't close completely or spring back open slightly.
Solution: Check if the door contacts the cabinet or adjacent door before the hinge reaches full closure. Adjust depth to pull the door away from interference points. Verify that cabinet boxes remain square, as racked cabinets prevent proper door closure regardless of hinge adjustment.
Symptom: Gaps appear uneven between doors or between door and cabinet.
Solution: Use side-to-side adjustment to create uniform reveals. If adjustment range proves insufficient, verify mounting plate position. Incorrectly placed mounting plates may require removal and reinstallation.
Hinge Wear and Replacement
Symptom: Doors sag over time, especially heavy solid-wood doors.
Solution: First attempt height adjustment to compensate. If hinges appear worn or loose in their cups, replacement becomes necessary. Consider upgrading to heavy-duty frameless cabinet hinges rated for greater weight capacity.
Symptom: Soft-close mechanism stops working or becomes inconsistent.
Solution: Integrated soft-close failures require complete hinge replacement. Some separate damper systems allow lubrication or adjustment to restore function. Clean accumulated debris from damper components before assuming failure.
Installation-Related Issues
Symptom: Hinge cups pull out of doors or mounting plates strip from cabinet sides.
Solution: This indicates insufficient material thickness or incorrectly sized screws. Frameless cabinet hinges require minimum door thickness of 16mm and cabinet sides of at least 16mm. Repair stripped holes using wood filler, dowels, or specialized thread inserts before reinstalling hardware.
For specialized applications like corner cabinets requiring unique hardware solutions, explore options detailed in lazy susan door hinge installations.
Selecting Quality Hardware for Your Project
The market offers frameless cabinet hinges across wide price ranges, from economy imports to premium European manufacturers. Understanding what differentiates quality hardware helps make appropriate selections for specific applications.
Evaluating Hinge Quality
| Quality Indicator | Budget Option | Professional Grade | Premium |
|---|---|---|---|
| Opening cycles rated | 40,000-50,000 | 80,000-100,000 | 150,000+ |
| Adjustment range | ±1-2mm | ±2-3mm | ±3-4mm |
| Soft-close mechanism | Add-on or none | Integrated | Integrated with adjustment |
| Warranty coverage | 1-2 years | 3-5 years | Lifetime limited |
Cycle rating indicates how many open-close movements the manufacturer tests hinges to withstand. Kitchen cabinet doors average 10-15 openings daily, meaning a 50,000-cycle hinge theoretically lasts 9-13 years under typical use. Professional installations benefit from higher-rated hardware that extends cabinet lifespan.
Brand reputation matters significantly in hardware performance. Established European manufacturers like Blum, Salice, Hettich, and Grass invest heavily in engineering and quality control. While premium pricing accompanies these brands, the performance and longevity justify costs for serious projects.
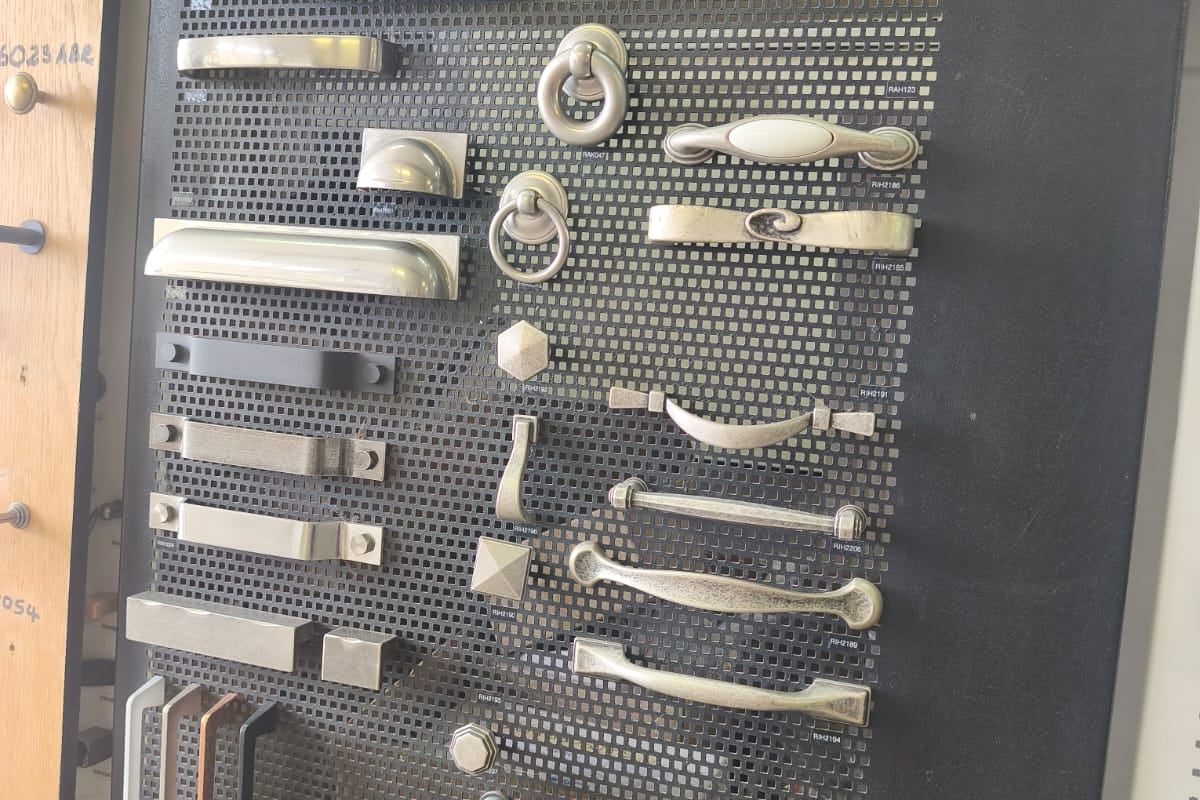
For homeowners, installers, and professionals seeking reliable hardware solutions, JM Cabinet Solutions stocks quality frameless cabinet hinges from trusted international brands, backed by practical installation guidance and technical support throughout the Helderberg and Western Cape regions.
Matching Hinges to Application
Different cabinet applications demand specific hinge characteristics:
Kitchen cabinets endure frequent daily use and exposure to humidity, grease, and temperature fluctuations. Specify corrosion-resistant frameless cabinet hinges with high cycle ratings and integrated soft-close for these demanding environments.
Bathroom vanities face constant humidity exposure. Stainless steel or heavily coated hinges prevent rust and maintain smooth operation despite moisture challenges.
Bedroom wardrobes and office furniture typically experience less intensive use, making mid-range hardware appropriate for these applications. However, large wardrobe doors benefit from heavy-duty hinges regardless of usage frequency.
Hardware Maintenance and Longevity
Proper maintenance extends hinge lifespan and preserves smooth operation. While frameless cabinet hinges require minimal upkeep, periodic attention prevents premature failure.
Regular Maintenance Schedule
Monthly tasks include wiping hinge surfaces during routine cabinet cleaning. Remove grease buildup, dust, and debris that accumulate in hinge mechanisms. Avoid harsh chemical cleaners that may damage protective coatings.
Quarterly inspection should verify that mounting screws remain tight, particularly during the first year after installation when cabinets settle and wood stabilizes. Retighten any loose hardware before it causes additional wear or damage.
Annual lubrication using silicone-based lubricant keeps hinges operating smoothly. Apply sparingly to pivot points and adjustment mechanisms. Avoid petroleum-based lubricants that attract dust and eventually gum up mechanisms.
Environmental Considerations
Installation environment significantly impacts hardware longevity. Frameless cabinet hinges installed in climate-controlled homes with moderate humidity typically outlast those in extreme conditions.
High-humidity environments accelerate corrosion even on plated steel hinges. Coastal homes or poorly ventilated spaces benefit from stainless steel or specialty-coated hardware. Ensure adequate kitchen ventilation to minimize moisture exposure.
Temperature extremes affect soft-close damping mechanisms. Hinges in garages or outdoor cabinets may require seasonal adjustment as damping fluid viscosity changes with temperature.
Professional Installation Considerations
Cabinet installers and contractors face unique requirements when specifying and installing frameless cabinet hinges across multiple projects. Consistency, efficiency, and reliability become paramount concerns.
Standardizing Hardware Specifications
Professional shops benefit from standardizing on specific hinge brands and models. This approach provides several advantages:
- Simplified inventory management reduces storage requirements and minimizes capital tied up in hardware
- Faster installation results from installer familiarity with specific adjustment mechanisms and mounting requirements
- Warranty and replacement simplification ensures consistent parts availability for service calls
- Bulk purchasing discounts improve project margins while maintaining quality standards
Many successful cabinet shops maintain primary and secondary hinge specifications: premium European hinges for high-end custom work and reliable mid-grade options for production-oriented projects.
Estimating Installation Time
Accurate time estimates ensure profitable project bidding. Experienced installers average these timeframes for frameless cabinet hinge installation:
- Door preparation and hinge cup drilling: 3-5 minutes per door (with jigs and proper tooling)
- Mounting plate installation: 2-3 minutes per hinge location
- Door hanging and initial adjustment: 5-7 minutes per door
- Final alignment and reveal adjustment: 10-15 minutes per cabinet run
Complete kitchen installations requiring 25-30 doors typically consume 6-8 hours of dedicated hinge installation time for proficient installers. Budget additional time for challenging situations like corner cabinets, tall pantries, or alignment corrections in older homes.
For comprehensive professional installation guidance, review detailed techniques covered in cabinet installation resources.
Specialty Applications and Advanced Techniques
Beyond standard door hanging, frameless cabinet hinges enable creative solutions for unique design challenges. Understanding these specialty applications expands design possibilities.
Glass Door Installations
Glass cabinet doors require specialized frameless cabinet hinges designed for reduced material thickness and different stress distribution. Glass door hinges feature:
- Larger mounting plates that distribute stress across greater surface area
- Extended boss screws that accommodate thinner glass thickness (typically 4-6mm)
- Rubber or plastic buffers that cushion glass against metal components
- Higher closing force specifications to handle the additional door weight
Always specify hinges explicitly rated for glass applications, as standard hinges may crack glass through concentrated stress points.
Angle and Corner Applications
Corner cabinets present unique challenges that standard straight-run installations don't encounter. Solutions include:
Bi-fold hinge systems that allow doors to fold in the middle, providing access to corner cabinet interiors without requiring excessive floor clearance for door swing.
165-degree wide-angle hinges enable doors to open fully despite adjacent walls or appliances. These specialized frameless cabinet hinges incorporate extended mounting arms that create the necessary clearance.
Pie-cut corner doors require careful hinge placement calculations to ensure the angled door edge doesn't contact adjacent cabinetry during opening and closing cycles.
Frameless cabinet hinges represent the critical connection between modern cabinet design and functional performance, offering adjustability and reliability that traditional hardware cannot match. Whether you're upgrading existing cabinetry or embarking on a complete kitchen renovation, selecting quality hinges and following proper installation techniques ensures years of smooth, quiet operation. JM Cabinet Solutions provides the premium cabinet fittings, expert guidance, and technical support that DIY homeowners, installers, and professionals throughout the Western Cape need to achieve exceptional results in every project.


Comments
Post a Comment